Saturday, October 26, 2013

Recycle Project: Papier Mache Pumpkin From the Kitchen

Pumpkins made by students in various stages of completion.
Papier Mache Pumpkins
Papier Mache  has been around since about the 2nd century AD. The advantages of papier mache products are in the strength of it from multiple layers yet it remains lightweight. Even today it remains a popular craft due to its versatility and affordability.

Papier Mache paste: Several papier mache paste products are available for purchase but you may easily make the paste at home in your kitchen. 
The cooked version dries clear and would be advisable for the finish when tissue paper is applied but for the basic constructions the raw version makes a stronger product. 

Raw Paste from flour: 
Start with a bowl of flour approximately 1 to 2 cups  to start the paste.  Add about 2-3 Tablespooons of salt to retard mildewing while drying. ( Using a wire whisk or a mixer add a little water at a time until the paste is smooth and about the consistency of pancake batter a little on the thin side.  The paste is ready for use. The paste will sour overnight if left out of the refrigerator.  I start with fresh paste each day.

Cooked paste:  For every cup of water add about 2 tablespoons of flour.  Bring to a boil and stir well.  Allow to cool.  Paste will thicken as it cools.  For thicker paste add a little more flour.  Paste will sour overnight if left out of refrigerator.  This paste will dry clear and can be used with the tissue paper for final application of color to the pumpkin. 


Materials:
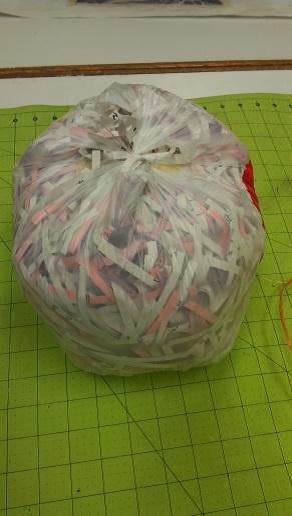
Plastic bag stuffed with shredded paper.
  • Paste
  • Plastic Bag
  • Shredded Paper
  • Old Newspaper
  • Tissue Paper
  • Optional: Water Based Polyurenthane
  • Optional: Wire (Coat hanger or Rebar)
Step by Step Instructions
  • Add shredded paper to a plastic grocery bag until firm. (Fill really well so that when tied it is full and as firm as possible.)
  • Tie off the plastic bag handle tightly. 
  • Cut several pieces of twine about 24” to 36” depending on size of bag. (Pumpkin shown uses three pieces of twine about 36” long.)
  • Tie all three lengths together mid way. 
  • Place the knot on the twine in the center bottom.  Stretch twine to the center top and tie tightly. 
3 lengths of twine tied tightly around bag.

  • Separate the twine individually into sections of the pumpkin. 
  • Apply paste on the plastic bag.  Lay a strip of paper over the wet area just pasted. With your hands apply paste over the dry paper and repeat adding paper then paste with your hands covering the entire plastic bag.
  • At the start of applying paper over the bag the paper will want to slide but keep adding paper. Additional paper layers should overlap covering the plastic. Once the plastic is covered keep adding additional layers building up several layers for strength and stability.
  • Allow papier mache to dry overnight.
  • Check for hardness. Apply more layers in areas that still seem too soft. If you can press an indention in the dry pumpkin additional layers are needed.
  • Last layer should be a clean thin paper without text or photos such as commercial grade brown paper towels.
  • Using a paintbrush apply a layer of papier mache paste, acrylic medium or thin glue.  (I prefer acylic medium because it dries clear and if using glossy will give a sheen.)  Lay small pieces of tissue paper  over the glued area and apply glue over the tissue paper with the brush. (the trick is to keep your hands off of the tissue paper.  Tissue paper is very fragile and will easy tear. Cut tissue paper into squares or random cuts then use the tip of a wet paint brush to pick up pieces as you work.  Tissue paper will easily stick to the tip of a wet paint brush so your hands never have to touch it.) 


Separate twine to make divisions.

Apply strips of paper over plastic overlapping edges of paper.


Optional Leaf:
Insert wire into the handle of of the bag  (such as coat hanger wire or rebar wire) to add strength for the stem. Make the wire long enough to twist for a vine and leaf. Push one end of the wire into the dried pumpkin in the stem area were the twine is knotted. Tape around both the twine and wire to temporarily hold in place.
Using strips of paper dipped into the papier mache paste wrap the stem and vine until the appropriate thickness and smoothness are achieved.

Wrap with green tissue paper while still wet or when dry as done for the pumpkin.

Cut out a left shape in newspaper. Cut a piece of wire long enough to run down the central vein of the leaf with enough to make a wire hook to attach on the wire stem. Cut about 6 additional layers of newspaper exactly the same shape as the leaf previously cut. Layers all leaf shapes together gluing each layer with papier mache paste. Let dry. Cover with green tissue paper.


 When completely dry varnish with a glossy water based polyurethane.
post signature

Sunday, August 18, 2013

The Youngest Artists of the Family


  It was going to be just another sewing day but three of my smaller grandchildren came to spend the day and as always they wanted to "do art".  I love those days!  I find them to be the most fun, most inspirational and most satisfying while being a great brain development exercise for the little ones. 

As usual I had a sack of scraps hanging off of my cutting table from various projects I have been working on.  I figured I would put the little ones to work and continue my own work.  But soon their work looked more tempting to me than my own.  I was on the floor with them helping them cut out shapes from my scraps while they glued them in place. 

Pearson, who is five and just ready to start kindergarten this year, drew this adorable rabbit with his ears coming out of the sides of his head and such a fat, fat rabbit probably because he has been in someones carrot garden.

And seven year old, Reese drew an owl.  After it was finished she looked at it with and said, "Is this a skinny bird or a fat owl?" Well, it didn't matter.  It is just plain cute! 

Reese also, drew this cute little puppy for her three year old sister.  

We decided these fun creations had to BE something.  Reese excitedly, said, "CAR PILLOWS!" 
And so they are!  Cute little pillows only 11" x 14" just the size for tucking into the side of the car seat for the kids while on long trips.  Big pillows are too bulky but these little mini-pillows are perfect....and fun!

So now, the children are the artists for the car pillows and I am just the seamstress, the pattern writer and gopher for these upcoming and very special new entrepreneurs.  HOO knows,  maybe they will start a little college fund!   Patterns are available through  my craftsy store:


post signature

Tuesday, August 13, 2013

From Guilt to Quilts

It is just so easy to rush down to a store, pick out something cute and wrap it up for a gift for the baby shower, or for Christmas, or for whatever upcoming occassion  but I have to admit feeling just a bit guilty for not making cute things for my grandchildren while so many of my family and friends were making quilts and blankets and cute things for My grandchildren. 

At the baby showers, I would have a gift and it would be something...well...nice enough but not special...Not an heirloom for the child. And then a large flat box wrapped nicely with a bow....SNAP...out flips this beautiful handmade quilt and the guests look at me expectantly....but no, it was my sister, or my mother, or my mother-in-law.  And then there is my....little offering! 


Most of us from my generation have special quilts we remember from our childhood.The quilt we wanted to be under on cold nights; the one we wanted when were sick or just sick at heart.  I could not understand why the quilt was under the chenille bedspread instead of on top of the bed so I would turn the bedspread down to show the quilt but by the time I returned the bedspread was back.

So...here goes...finally, I'm going to start working for the my grandbabies. 

Well, not all are babies anymore but all love to have something special that is just for them. Now that they are actually older the quilts can fit their personalities a bit better than when they were babies.


And did I mention I have twelve grandchildren from 15 years old (sophomore in high school) to 2 months old!

 I have my work cut out for me! 
I am going to be back paddling a bit!

Here are two of my designs: "Paisley & Her New Friends" a 40" x 52" quilt and Emerson & Friends: a 40" x 40" nap pad for the littlest baby.  Both have a 36" applique panel that can be used interchangably.  Make Emerson & Friends into a quilt or make Paisley & Her New Friends into a Nap Pad. 

*Notice  I have designed sides for the nap pad to keep the baby from rolling off a bed.  The sides are made of pool noodles cut to size and inserted into casings sewn into the sides of the nap pad.  The pad is a 1/2" layer of foam so baby has a soft place to lay his head. 

Both designs are available through my craftsy store


Monday, May 13, 2013

Going Craftsy! Printing On Fabric


I have gone Craftsy and I am "That's Artrageous"!

If you have not discovered Craftsy it is a download site with patterns and instructions and all sorts of fun things to do for Craftsy people in this world.

It is a recent discovery for me and I am  enjoying being creative.


Have you discovered direct print to fabric?
I have been playing with the idea and the project I uploaded to Craftsy is one that can be printed directly on cotton fabric (use the lighter colors for the black ink).  The bag you make could be just like this one.

I printed directly onto yellow cotton fabric through my inkjet printer once my fabric was prepared.   What a fun project it turned out to be.  I think I need to make a dozen or so and start giving them out as gifts!  It sews up extremely quickly. I plan to load it with pencils, crayons and treats and give them as the party favors at my next party! 


Tuesday, February 19, 2013

I'm a Little ARTrageous!


 It's all about me! 
And I am feeling a little ARTrageous!
ARTrageous Bag: Front view flap
Being that I am really more of an artist than a quilter, ARTrageous is more about me.
And as I get older, I load on more and more jewelry and love more ARTrageous prints (especially animal skins) and outfits.  And of course, just being an artist means I must be a little....well....weird!

So I adapted the Amy Bradley's patten image to be more about me.  And since I love to make bags and purses, I decided to do one more bag for the blog.
It is going to be so good when I get it done....but...
time is spinning on and my project is not quite finished....so I am rushing...and rushing...and of course, when you rush that is when things start to happen! 

It was going so well until...
the thread on my machine broke....

Side view
and I could not rethread it.....and I tried....and tried...and tried again...I even took the needle out and tried to thread it in better light and then tried to put it back on the machine....but, well, no...then I decided it was the old needle and tried a new...one more time...and it threaded easily. 

Okay, back on track, sewing smoothly, evenly, and without a hitch.....
but oh, no, the bobbin ran out! 

As the evening wore on, it became dark and a hunger husband arrived.... I needed to take a little break to prepare supper.  But not before quickly finishing up the purse lining and then I can sit down and finish up. 
Back view: pockets, pockets, pockets.
But no!  the lining was backwards so I put the water on to boil for supper and starting ripping out lining stitches....but when I was inches from finishing ripping out I realized ....I was wrong ....and had done it right!


Magazine pocket under front flap.

So that's it for me! 
A special thanks to Amy Bradley for her inspirational pattern.
and a special thanks to Madame Samm for her motivational blog hops. 
and another special thanks goes to Marlene for being our cheerful leader! 
As usual, it has been fun!

Several of you have asked about what pattern I used for this purse so I am adding this to the post.  
The design is mine.  I made it up as I went along.  Every time I see a purse, I look at it and add it to my memory of good ideas to do and I love pockets and divisions in purses and am always looking for ways to make them easily.  Seldom will I actually buy a pattern.   I just wing it.  So I make mistakes and have to correct and redo but it is all fun to me.  At some point I might try to write up patterns but this is one of a kind at this posting.  I appreciate all of the sweet comments I have gotten and inquiries about the pattern.  You have made my day!! 
Detail of pattern design 

Buzzing and Bumbling

Wednesday, January 23, 2013

And the Winner Is....


It is always so much fun to have a giveaway and a surprise one at that! 
 
IOh, but I made two bags to give away and have two Chlorox pens instead of one!   And today....January 24th 
 is our
In Your Words Blog Hop
cheerleader
Linda's birthday
 so not only will I have a bag and a Chlorox pen for one of you but also, one for Linda. 
 
Happy Birthday, Linda! 
And a special thank you for being my wings!
 
I hope you will enjoy the bag as much as I enjoyed making it for you. 
 
So...
DRUMROLL
..................
 
MoeWest (Maureen)
 is the winner of my
In Your Words 
giveaway. 
 
 
Be sure to contact me and tell me where I can send it. 
 
Thanks for a fun time. 

The bag has a squared bottom, zebra print medium weight fabric on the outside, lined with lime green chevon print and same contrast border, have grommets with cording roped through to make cinching the bag easy.  Measurement are approximately  9" x  14" x 5"....not a backpack but a fun sturdy bag for whatever your need. 

Next post: Instructions for making this bag
Sorry, guys.  I just ran out of time today.


Tuesday, January 8, 2013

In Your Words: My Little Gems' Gym Bags/Designing with Bleach

The thread was flying,
the needle bobbing,
and last minute preparations for the day's blog hop were keeping me in a stir all week and into the night! 
In fact, I was in such a rush I even threaded my machine needle with my bobbin thread! 
Now that is a new one on me!!
And believe me I have done some doozies in the past! 
Just last week shopping in Costco with Linda (yes, Linda who is our blog hop leader and my sister) I walked off with the wrong shopping cart! 
It went unnoticed until Linda wanted to know where her Nutella was and... where were my HDMI cables?
Trust me... life's a trip!
Never a dull moment. 

It is all worth it to be able to share my little gems' gym bags!
My little gems are my eleven grandchildren.  (That makes me sound so old!)
This Valentine's day they will be receiving their own personalized gym bag
with a few little surprises inside....
nine bags completed!  Two more to go.

So my contribution to our blog hop today are the little gym bags with some fun words
bleached and embellished.
Designing with Clorox Pen and fabric marker!


Here are the guidelines for this project:
  1. Do a time bleach test on a sample of your fabric to decide how long to leave the bleach.  I cut several 1" squares and squeezed a little bleach on each and rinsed one at a time in 10 minute intervals. 
  2. For the bag cut two panels 15"(or 14) x 18" (I got four bags from one yard of 60" wide cotton duck)
  3. Press each section onto the waxy side of freezer paper to stabilize during bleaching.
  4. Design the fabric with the Clorox pen using the narrow tip side. Squeeze gently and evenly, moving as smoothly as possibly.   
  5. Watch the clock and rinse at the appropriate time previously decided in the bleach test. Gently remove from the freezer paper.
  6. Add baking soda liberally to the wash tub of cool rinse water or you can sprinkle baking soda directly onto the bleached area and then rinse.
  7.  Rinse in cool water until all the bleach is removed.
  8. Lay the fabric on an old towel. Roll the fabric into it and gently squeeze.  Open it up, remove the panel from the towel. Lay flat to dry. 
  9. Once dry.  Go back into the design using a Fabric Sharpie marker and embellish with more details.  The fun continues!
  10. NOTE:  Pictured below, way below, are the Clorox types I used.  I used the Pen type to draw and then used the gel (toilet bowl cleaner) in a bowl for stamping the bleach.  The gel is more liquified and thus runs outside of the lines more.  But for those of you who do not have the Clorox pens you MIGHT try the gel in a bottle with a NARROW opening like a glue bottle. Be resourceful and let me know how it works.   I have not tried this myself but now I will have to!
The Gem Bag Construction
      • Press down  1" on top edge of both pieces.
      • Clean finish the top edges on both pieces (zig-zag or stitch a narrow edge)
      • On sides about 2" down (where the casing will be open for the drawstrings) clean finish the edges.
      • Stitch along the top, leaving the ends open.
    • Sides and Bottom of bag
      • Stitch sides starting at top stitching leaving casings open on the sides. 
      • Stitch bottom and opposite side ending at stitching for casing.
      • At bottom corners stitch diagonally creating a triangle 2" in both directions from the corner.  This will be for serve to lessen stress on grommets.
    • Grommets
      • 1/4" grommets are attached using manufacturer's directions.  Place in bottom corners inside of triangles.
    • Drawstings
      • 1/4" cording ( I found 1/4" clothesline rope in white at my local grocery store which is economical, attractive and sturdy. 100' for about $2)
      • Cut two sections each about 2 yards long.  (Total 4 yards per bag.)
      • Run the first cord through both casing returning to its starting place.  Pull cord ends down to the grommet and run both ends through the grommet and knot ends together to keep them secure. 
      • Second cord will start on the opposite side as the first cord, run through both casing and returning to where it started. Pull cord down to grommet and secure
        with a knot. (The first cord starts and ends on one side.  The second cord starts and ends on the opposite side.  To close the bag pull the cords on both sides at the same time. )
       

Thank you, Madame Samm and Linda!  What a great idea! 

This has been a fun experience! 

Oh, I almost forgot! 
Leave a comment so I will have a record of your visit and enter you in my...

SURPRISE GIVEAWAY! 

The Winner will be announced on Jan. 24th!

Now, don't forget! 
Be sure to drop in on all the other participating blogs for today. 
Wednesday, January 9
Kathy's Quilts (Kathy W.)
Sunshine Quilting (Martina S.)
Doodling in My Mind (YOU ARE HERE  Darla)
Grammie Q's (Charlotte M.)
Dancing Moon (Carla B.)

Sing Out Loud...Swing High....Watch Ants Crawl..
Find the Artist who's inside of you!
See you in the blogs!
Darla

Wednesday, January 2, 2013

Sneak Peek for In Your Words

In Your Word Blog Hop
Jan 7th-16th
 
Oh, I need to get to work! 
That blog hop I signed up to do is just next week! 
And here I am putting together jigsaw puzzles and watching old movies on TMC,  leisurely taking down the Christmas decor and keeping warm while enjoying my time off! 
Which by the way, I'm not ashamed of not being more productive but it is time for me to start putting my mind to some more creative endeavors.
 
In Your Words is the blog hop that has me hopping right now!
I am anxious to see what the other bloggers have in their minds. There are so many new things on the market and I expect to be seeing some fun ideas, to be impressed, to be inspired and motivated to action.   
 
And not a minute too soon for me!
 
You may think the hard part is coming up with the technique but instead for me the hard part has been in coming up with just the perfect words! 
 
Do I want to be funny?
...or inspire goodness?
...or state the obvious?
...or do a play on words?
 
What words do I use?   
 
And then there is this personal drive to do something that is new to me! 
For this project I want to do something I have NEVER done. 
I have considered a number of things and when I think I have a good idea I find someone else has already done it and sometimes, even marketed it. 
 
I have written it, and sewn it, and glued it, and waxed it and even pixelated it! 
But how do I want to do it this time?
 
Well, here is my sneak peek! 
Bleach! 
 
But bleach what?
 
I'm not telling...not yet! 
But I will drop a hint or two!
A child will like it...or even a teen...
and you will have all the information to complete the project yourself
without even buying a pattern. 
And
there will be tips to set you up for successs
and a giveaway
and  all you will need to do is
drop me a line in the comment section next Wednesday
and your name will be added to the drawing
which will take place on the 24th which is Linda's birthday. 
 
So until then enjoy the first week of a new year!
post signature